skip to main |
skip to sidebar
The recipe for these chocolate-orange brownies caught my eye in the March Bon Appetite issue. I love a chocolate-orange flavor combination, so I couldn't resist. I was so confident in the brownies, I actually made them for a meeting (of course, I crossed my fingers). The orange flavor balanced well with the more intense dark cocoa I used (the recipe called for regular unsweetened cocoa, but I only had Hershey's special dark). The recipe also called for pecans, but my fridge only offered me the choice of almonds or walnuts, so I went with walnuts (not toasted). The brownies were moist, cake-like, and delicious.
This recipe can be found on pages 21-22 of the March issue for Bon Appetite in the R.S.V.P. section. It is adapted from the Homepage Cafe in Bozeman, MT.
Chocolate-Orange Brownies
nonstick vegetable oil spray
1/2 C boiling water
6 T natural unsweetened cocoa powder
1 1/4 C packed dark brown sugar
3/4 C all-purpose flour
1/2 t baking soda
1/2 t baking powder
1/4 t salt
1 C pecans, toasted, chopped
2 large eggs
10 T (1 1/4 sticks) unsalted butter, melted, cooled
1 T finely grated orange peel
1/2 t vanilla extract
Preheat oven to 350 degrees F, Spray 9x9x2 inch metal baking pan with nonstick spray (I used a silicone pan). Whisk boiling water and cocoa powder is a small bowl to blend. Whisk sugar, flour, baking soda, baking powder, and salt in medium bowl to blend. Add butter, orange peel, and vanilla; whisk to blend. Whisk cocoa mixture into egg mixture. Add flour mixture; stir just to blend. Transfer to prepared pan.
Bake brownies until tester inserted into center comes out with a few moist crumbs attached, about 30 minutes. Let cool completely in pan on rack. Cut into 16 squares and serve.
Enjoy & thank you Homepage Cafe and Bon Appetite!!
Four months ago, I challenged myself to only eat from the contents of my fridge and pantry & only buy from a list of 25 staple items to inspire culinary creativity, save money, and curb unnecessary grocery spending. How I did depends on your outlook. If you are a multiple choice or fill-in-the-blank type of person, I probably barely passed. However, I am more of an essay type person, so I think I passed.
For the first part, did I only eat from the contents of my fridge & pantry? No. I did, however, use up approximately 25% of my contents, so yea for me:). In doing so, I created meals using ingredients I had on hand supplemented with staples.
Here is one of those meals. It was inspired by a casserole my mom made and modified to be vegetarian with TVP, green olives, and a yellow pepper.
It tasted much better than it looks, especially with my toppings (yogurt, bottom-of-the-bag tortilla chips, and some green onions).
Did I only buy from my list of staples? No. I did, however, stick pretty close to it. My strays were mainly other vegetables and fruits, or buying more than one item due to sale price. Though, I must confess I bought a few things completely unrelated to my staples list due to sale price or a serious craving. I did definitely spend less on groceries. I even shopped once based on coupons and related sales and saved a whopping 48%.
It was also my goal to eat out less, which I did accomplish. I wasn't perfect, as it was my goal to only eat out for legitimate reasons (like book club or meeting friends). Laziness & convenience overcame me a few times, but, well, I'm weak some times. One thing I did stick to is only getting Starbucks when I can expense it, or with a gift card. There are 2 things I always have ingredients for: tacos and PB & J, so I went back to eating a lot of tacos and PB & J.
In conclusion, even though I strayed from my list of staples, gave in to the convenience of dining out, and sometimes ignored the contents of my pantry and fridge, there were areas of improvement. I got creative in my kitchen, and reminded myself how much I love to bake and cook. I definitely saved money, and saw the benefits of shopping smarter. I even learned to control my Starbucks addiction. Overall, I give myself a B-, and plan to continue with my renewed habits.
Last night, my dinner was a frito tomato soup (gazpacho). I realize it is spring now, and winter is usually the season to crave soup (it is the second soup I have made in a week); I guess I am off-season a bit. Anyway, I actually had the soup two nights in a row, the first night, hot, and last night, cold. It was excellent at both temperatures.
Below is the recipe. Please note, measurements may still need to be tweaked, as this was my first attempt.
1 can tomato soup
1 28oz can of peeled tomatoes in sauce (I went with Italian style with basil)
4-5 green onions (not stalk), diced
2-3 T rosemary
1-2 t cajun spice (I like Slap Ya Mama, by Walker & Sons)
salt & pepper
fritos
Optional: shredded cheese, diced bell pepper, chopped avocado, plain yogurt, cucmbers, and chives (green onion stalk)
Cook ingredients for 10 minutes, or until heated. Serve with fritos, and any optional toppings.
May be served warm or cold. If serving cold, chill before serving.
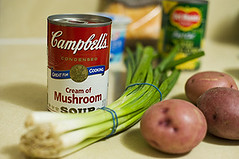
Cream of mushroom soup was on sale, so I had a couple cans. What does one do with cream of mushroom soup, if one is not in the mood for tuna or green bean casserole? Online did not offer much help, as chicken seemed to be the star ingredient (no chicken for this girl). My heart was set on chowder, so I gathered some ingredients, and crossed my fingers.
 See, not too shabby, and pretty tasty... (Harris Teeter made the bread). Below is the recipe, but keep in mind this was the first try, so it may need some tweaking :).
Mushroom & Corn Chowder
1 can Cream of Mushroom Soup
1 can Whole Kernel Corn, drained
2-4 green onions (not the stalks), diced
1-2 garlic cloves, diced
3 small red potatoes, peeled & diced
1-2 T butter
1-2 t truffle oil
2-4 T lime juice
4 sprigs of time, dried + 1
1-2 t hot pepper sauce
salt & pepper
Optional, but recommended: serve with shredded cheese (I like sharp), plain yogurt (Greek style is my choice) or sour cream, and green onion stalk or chives
(1) Add chopped green onions, garlic, and potatoes to 2 qt. saucepan.
(2) Add oil, butter, lime juice, salt & pepper. Cook over Med. High heat for 10-15 minutes, stirring regularly. Add more lime juice, if seems too dry.
See, not too shabby, and pretty tasty... (Harris Teeter made the bread). Below is the recipe, but keep in mind this was the first try, so it may need some tweaking :).
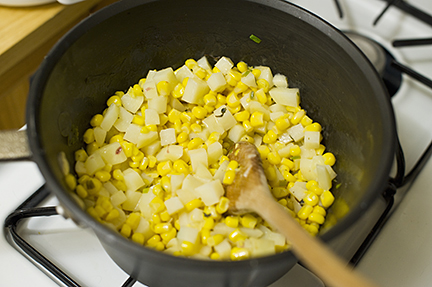
Mushroom & Corn Chowder
1 can Cream of Mushroom Soup
1 can Whole Kernel Corn, drained
2-4 green onions (not the stalks), diced
1-2 garlic cloves, diced
3 small red potatoes, peeled & diced
1-2 T butter
1-2 t truffle oil
2-4 T lime juice
4 sprigs of time, dried + 1
1-2 t hot pepper sauce
salt & pepper
Optional, but recommended: serve with shredded cheese (I like sharp), plain yogurt (Greek style is my choice) or sour cream, and green onion stalk or chives
(1) Add chopped green onions, garlic, and potatoes to 2 qt. saucepan.
(2) Add oil, butter, lime juice, salt & pepper. Cook over Med. High heat for 10-15 minutes, stirring regularly. Add more lime juice, if seems too dry.
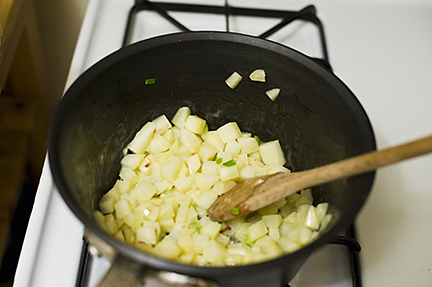 (3) Add corn, and stir. Lower heat to Med. Low, and cover. Cook another 10 minutes.
 (4) Add soup, milk, 4 sprigs of thyme (remove thyme leaves from sprigs), and hot sauce.
(5) Cover. Cook, stirring periodically, 20-25 minutes, or until potatoes are done.
(4) Add soup, milk, 4 sprigs of thyme (remove thyme leaves from sprigs), and hot sauce.
(5) Cover. Cook, stirring periodically, 20-25 minutes, or until potatoes are done.
 (6) Add last sprig of thyme, and stir.
 Serve hot. Toppings & crusty bread are optional. Enjoy!
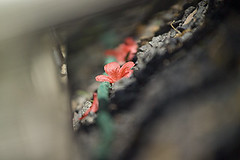
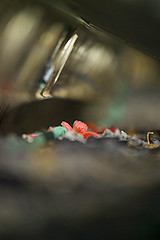
Beautiful backyard blossoms were aplenty for me this weekend (a bonus for me for house sitting). The previous homeowner was quite the gardener, and my green-thumbed friends are continuing the backyard botanical garden.

So, spring's blossoms in my neighborhood do not include the darling cherry blossoms, but I still found plenty to admire...

Ahh, the Tidal Basin cherry blossoms....
 They really are beautiful, even when seeing them means having to toughen up to brave the throngs of other onlookers, tourist groups, strollers, tripods & cameras.
 The cherry blossoms entice people to travel in from other states, and even other countries. Yet, I live just across the river, and it took me four years to pay a visit
.

Do you have a voltmeter? Okay, it's probably not on your list of basic tools, but if you grew up with an engineer as a father, you probably saw him use it. I saw my dad use it on appliances, cars, and batteries throughout my childhood, and even as an adult. About 5 years ago, my condo's dishwasher suddenly stopped working. Before I called a repairman, I called my dad; he asked if I had a voltmeter (sure, Dad...). Of course, I knew to have a hammer and a screwdriver, but even as a frequent eyewitness to my dad's love of the voltmeter, it had not made my list.
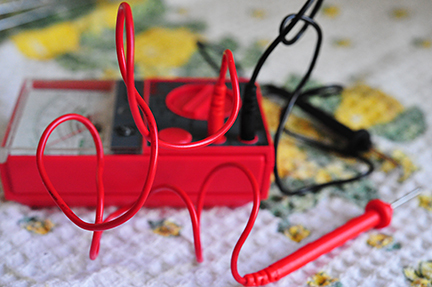 After talking to my dad, the voltmeter was added to my tools. Thanks to the voltmeter, I discovered there was still an electrical current. The dishwasher problem was not its fault, but rather mine, as I did not realize it shared the same circuit as my garbage disposal and light, which I had turned off - oops. However, without the voltmeter, I would have had to call a repairman (my dad doesn't live near me). Besides providing fodder for a repairmen water cooler moment, or two, I would have had to pay money for it. As usual, when it comes to mechanical & electrical topics, my dad was right.
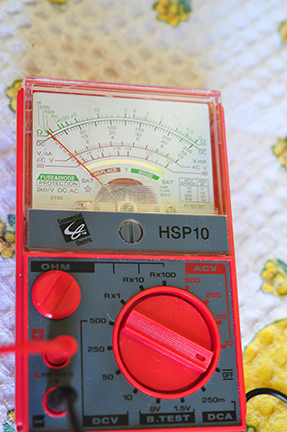 There are lots of voltmeters available, but I chose the simpler analog type (my dad uses one). Voltmeters measure in ohms or volts. To use, set wheel to appropriate voltage (e.g. 1.5v for AA batteries). For a battery, place the longer red probe on the positive end of the battery, and the black one on the negative end. The shorter end of the red probe goes into the positive, and the black into the negative. Batteries with life will measure in the green. That's it - so easy! A voltmeter can also help you diagnose problems with your toaster, microwave, car, and other electronic devices and appliances. For real instructions, go to All About Circuits.
 Adding a voltmeter to your tool chest could not only help you save money by getting to skip a call to the repairman, but owning one may actually impress your man friends, or even your dad.
So, what about my "new" frames? Did I put them to use, and hang some art?
 I did - cool kitchen art - thanks to Studio Fuller.
 Beth Hannon Fuller is the owner and artist behind Studio Fuller. She makes fun, whimsical small-scale (postcard-size) mixed-media art. She combines drawings with fabric and pages from old books to create her quirky pieces of art. She sells her prints in her Etsy store, Studio Fuller. She also does all the cartoons and illustrations for BRAIN, CHILD, The Magazine for Thinking Mothers.You can also find her illustrations and art on her fun blog Studio Fuller Blog.
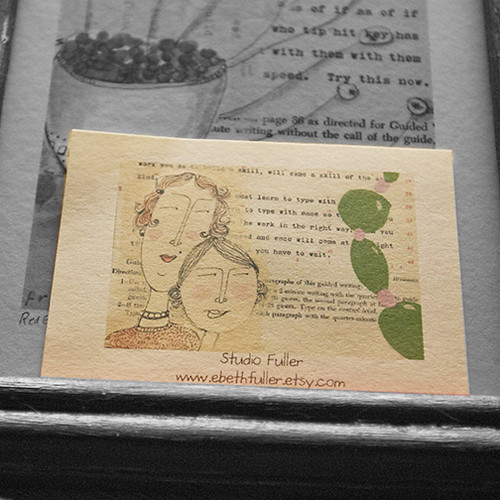 So, here are the prints hanging on my kitchen wall; they are perfect in my kitchen. Why? First, I love berries. Second, my main kitchen colors are blue and red. Third, paisley prints were big in my childhood (fabric with the currants). Fourth, I love to travel (map with the blueberries). Lastly, the quirky prints just make me happy, especially when I am cooking at my stove.

Moving into a new apartment is exciting, but covering 75% of its hardwood floors can be challenging, especially on a budget (agggghhh!!). Hardwood floors are so beautiful, so it's a shame when landlords make tenants cover them (okay, not really - I get why); I just want to admire more than a quarter of my floors:). Of course, I looked at the usual discount shops (Target, Ikea, TJ, etc.), and hunted Craigslist multiple times, but the options were pretty lackluster. Fortunately, other thrifty tenants have run into the same challenge; my favorite idea was from Bartleby - paint dropcloths.
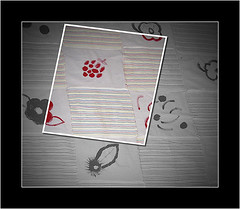
DISHCLOTH DROPCLOTH RUG
 You need:
- 1 lined paint dropcloth
- 2 packages of dollar store dishcloths (for 5'x5')
- Paint
- Iron
- Ultra fusible bond tape, at least 3/4" wide
To make:
- Unfold dropcloth & turn on iron.
- Follow instructions on fusible bond tape, & attach to 1 side of first dishcloth. Repeat for all 4 sides of dishcloth.
- Follow same instructions to attach dishcloth to dropcloth in the pattern you want. FYI, the dishcloths do not fit perfectly across, but are pretty close.
- If desired, paint.
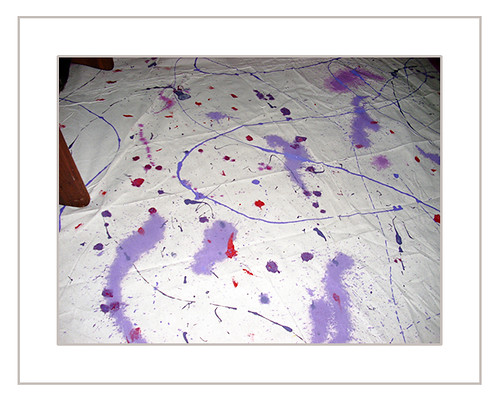
 PAINTED DROPCLOTH RUG
Clearly, I needed a larger dropcloth for my living room, so thank goodness the cloths come in multiple sizes. This rug is my sad ode to Jackson Pollack in pinks & purples. I loved making it, and highly recommend throwing paint. However, I'm not so certain my floor would agree. Apparently, not all dropcloths are lined. Not only was my floor also pink & purple, stuck to the rug in places. It required using a mixture (of course, products were not actually used together) of Murphy's Oil Soap, Goo Gone & Meyer's general cleaner over several hours and days to remove all the paint. Thus, be sure your dropcloth is lined.
PAINTED DROPCLOTH RUG
Clearly, I needed a larger dropcloth for my living room, so thank goodness the cloths come in multiple sizes. This rug is my sad ode to Jackson Pollack in pinks & purples. I loved making it, and highly recommend throwing paint. However, I'm not so certain my floor would agree. Apparently, not all dropcloths are lined. Not only was my floor also pink & purple, stuck to the rug in places. It required using a mixture (of course, products were not actually used together) of Murphy's Oil Soap, Goo Gone & Meyer's general cleaner over several hours and days to remove all the paint. Thus, be sure your dropcloth is lined.
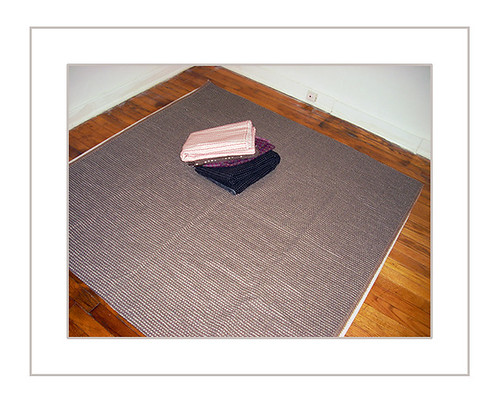
 UPHOLSTERY DROPCLOTH RUG
You need:
UPHOLSTERY DROPCLOTH RUG
You need:
- 1 lined paint dropcloth
- Upholstery remnant, enough to cover dropcloth with extra for hemming (or close)
- Iron
- Ultra strength fusible bonding table, at least 3/4" wide
- Quilt batting to cover dropcloth
To make:
- Unfold dropcloth, & turn on iron.
- Measure upholstery fabric to evenly cover dropcloth, & hem.
- Follow fusible bonding tape instructions to adhere to upholstery fabric, and repeat for each side.
- Follow same instructions to attach upholstery fabric to dropcloth on one side. Repeat for 2 more sides.
- Slide quilt batting through opening on 4th side between fabric & upholstery.
- Attach 4th side to dropcloth.
*NOTE: Do not worry if your upholstery remnant does not quite fit, furniture can disguise it.
 Dropcloth rug pros:
- Cheap - $5 for a 5'x5' & $19 for room-size (maybe 15'x12')
- Neutral color
- Very paint-friendly
Dropcloth rug cons:
- Easily wrinkles
- Does not quickly vacuum
- Not very cushy for walking & standing
** NOTE: Use either quilt batting or a rug pad underneath dropcloth to add cushioning, and help keep it in place. An old comforter or blanket could also work. Of course, furniture will help anchor it in place.
Today, I went with a falafel burger for lunch. Falafel is a Middle Eastern dish made from garbanzo beans (aka chick peas), and typically served in a pita with yogurt. The idea of falafel is very good (protein & spices), but its execution seems to vary; sometimes, I love it, and other times, it is just awful. Now, I could have ordered it from an experienced restaurant, or followed a well-loved recipe, but I went for a mix I found at an ethnic grocery store. I could have followed the instructions on the box, and made falafel, but I wanted a burger. I did add the water, but then I just made a patty & placed it in my Pam-sprayed skillet. It fried pretty fast, so I baked it in the oven for a few minutes to melt the cheese. Then, I sat it on some broccoli slaw (for some veggies), and added my beloved Trader Joe's Red Pepper sauce. At the last minute, I even threw in a couple pickles. Finally, I took a bite; it was horrible. Even using my never-fail mustard dousing (my go-to method for finishing my "no thank you" helpings as a child) did not make it tolerable.
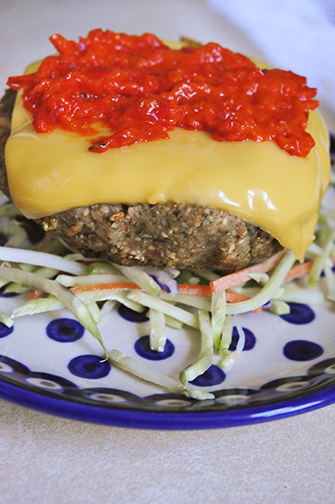 The boxed falafel did have some redeeming uses, as it added pizazz to my tomato soup, and made a subtle falafel-spiced "sloppy joeish" lunch. Next time I want falafel, I will just stick with the tried & true.
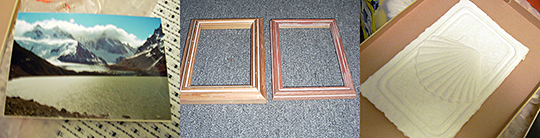
You can't find the perfect frame? Make the perfect frame with a thrift store makeover. Thrift stores often have a lot of frames for cheap, but you can't let the bad art scare you.
The key is to find the style and size you want. Remember, glass can be replaced, and frames can be painted or stained. I found 2 remotely similar 5x7 frames at a thrift store for $1.41 for one, and $0.99 for the other.
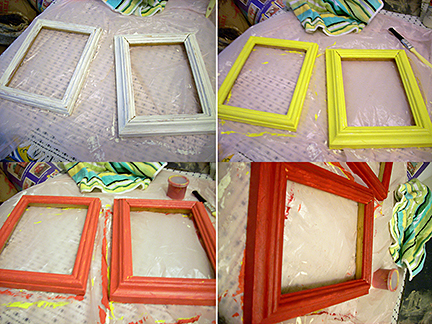
 After cleaning and sanding the frames, I painted them white. Then, I added a layer of yellow, a layer of melonish-red (I mixed it), and finally, a layer of red. My paints are just the cheap tubes of acrylic paint you find at craft stores, and used at full strength (you can thin them with water).
 Next, I used steel wool to lightly remove some of the paint to reveal the other layers. I wanted to add depth, and a somewhat aged appearance. For final touch, I rubbed beeswax on the frames for a protective layer, and a little shine.
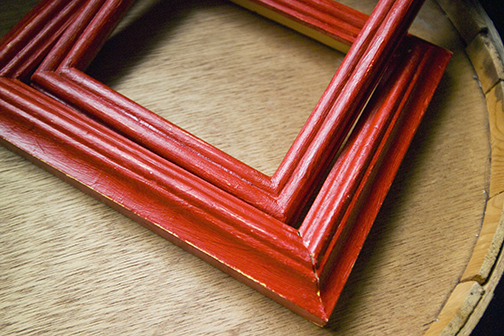 Of course, I am a bit biased, but I think the makeover was a success, and the frames make a nice pair
.